第 1 章:项目全景:为什么专业 RAG 先做关键词检索
第 1 章:项目全景:为什么专业 RAG 先做关键词检索
这一章解决什么问题?在动手写第一行代码之前,你需要先知道这本书带你走的是一条什么路。大多数 RAG 教程的默认动作是:装一个向量数据库,把文档切块,Embedding 塞进去,接一个 LLM 就宣布完工。这条路能跑通 demo,但在真实业务里往往第一周就撞墙——用户搜一个论文编号、一个模型名、一个缩写,向量检索给出的是一堆"语义相近"但完全不对的结果。开源课程仓库 jamwithai/production-agentic-rag-course 选择了另一条路线,它在 README 里把它称为 the professional path:先把关键词检索的地基打牢,再叠向量做 Hybrid Search。这一章就把这个判断讲清楚,并把后面七个星期要走的路、要装的组件、要花的钱一次性交代完。
项目定位:The Mother of AI project 的第一阶段
这门课程不是孤立的一个 RAG 教程,它挂在一个更大的规划下——The Mother of AI project。这个总项目被拆成 6 个阶段,Phase 1 RAG Systems 就是其中的第一阶段,而第一阶段的落地形态就是 arXiv Paper Curator:一个自动抓取学术论文、理解论文内容、并回答你研究问题的完整研究助手系统。
README 对它的自我定位写得很直白:learner-focused project(面向学习者的项目)。这个说法有两层含义。第一层是学习材料的存在形式:每个 Week 都配一个可运行的 Jupyter notebook,路径规律是 notebooks/weekN/,比如 Week 1 是 notebooks/week1/week1_setup.ipynb,Week 7 是 notebooks/week7/week7_agentic_rag.ipynb;notebook 里既有实现步骤,也有验证步骤(README 里叫 completion guide)。第二层是节奏:每周一个 release tag,从 week1.0 到 week7.0,你可以按周取代码。
# Clone a specific week's code
git clone --branch  https://github.com/jamwithai/arxiv-paper-curator
cd arxiv-paper-curator
uv sync
docker compose down -v
docker compose up --build -d

# Replace  with: week1.0, week2.0, etc.
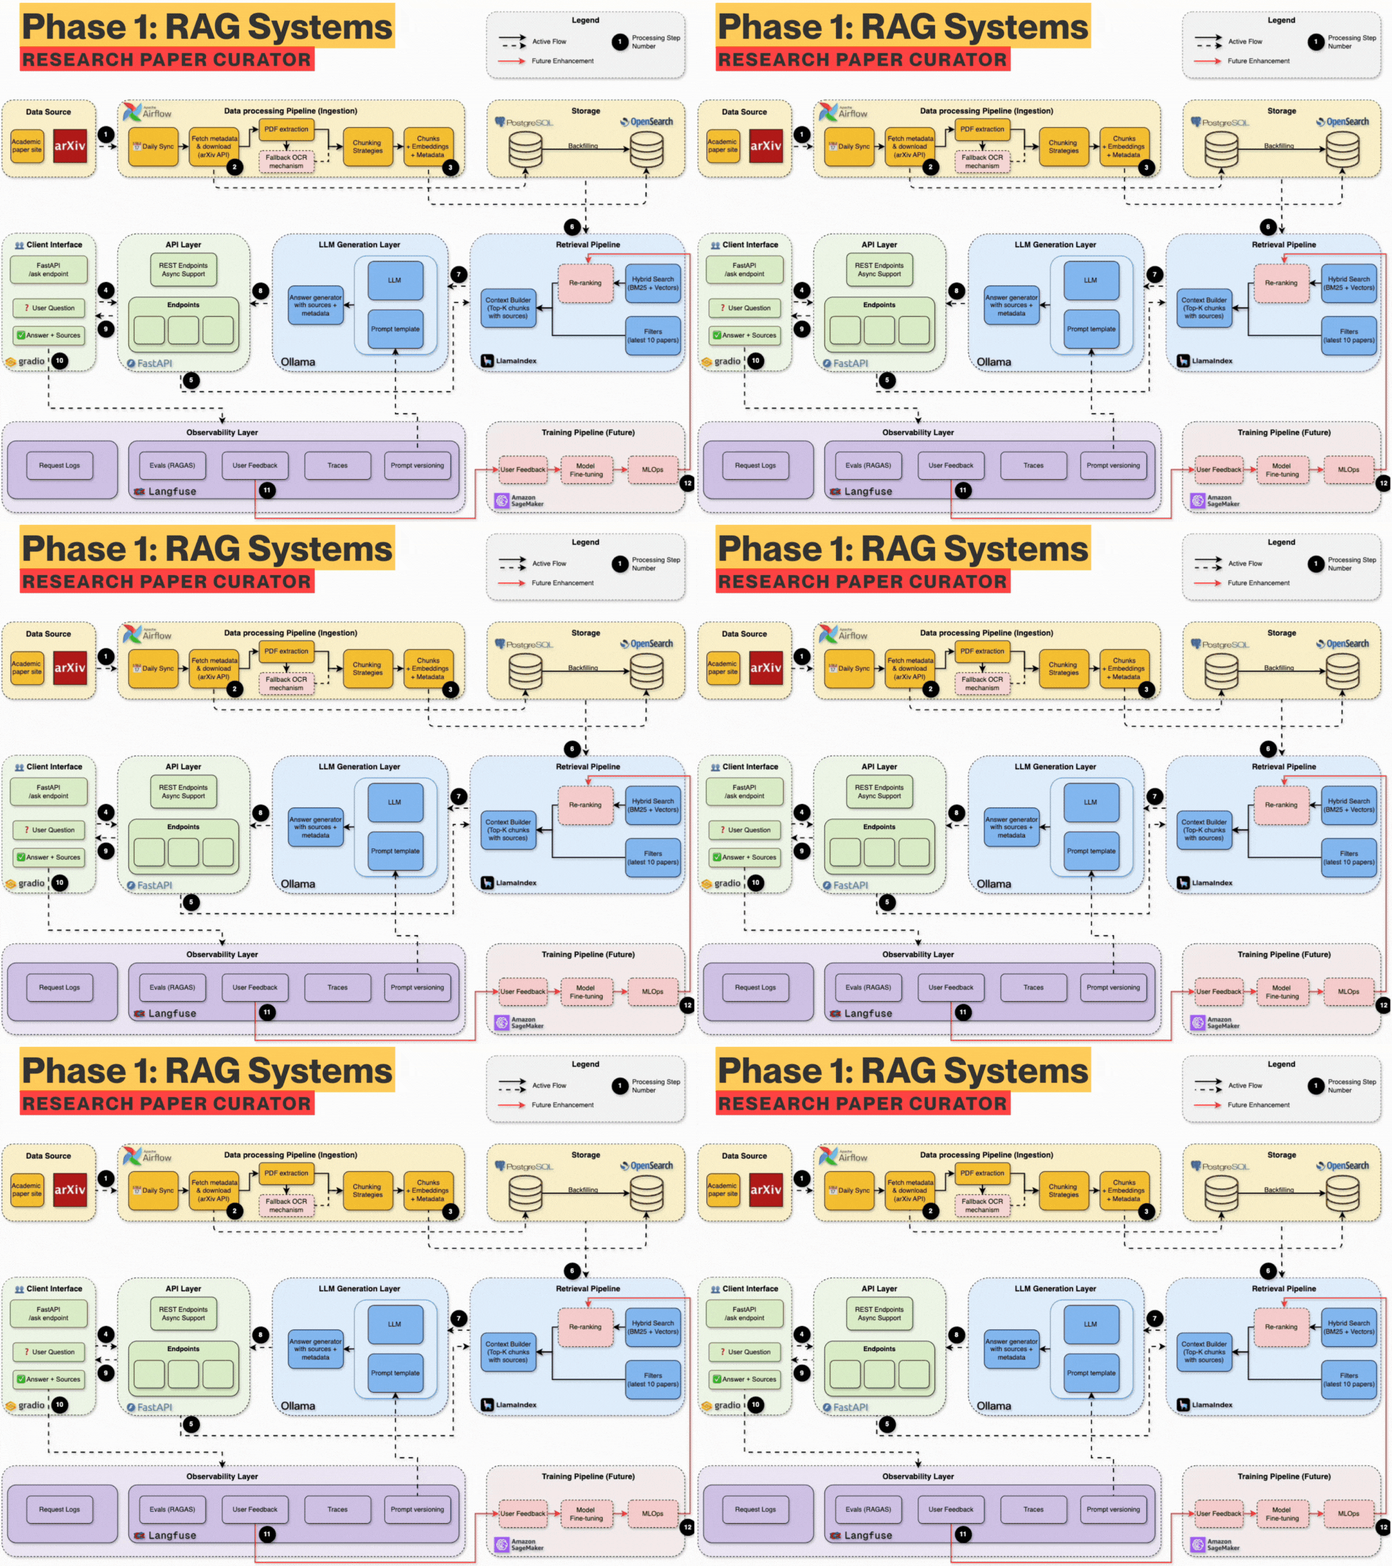
按周打 tag 这件事本身就是教学设计:你可以停在 Week 3,得到一个纯 BM25 的检索服务;也可以跳到 Week 7,直接读 Agentic RAG 的完整实现。想看清各 Week 之间的架构演进关系,README 顶部这张图是最快的入口——它把从基础设施到 agentic 层的组件依赖画在了一起。
最重要的路线判断:为什么不从向量开始
把这句话单独拎出来,因为整本书的取舍都从它推导而来。README 原文的表述是:Unlike tutorials that jump straight to vector search, we follow the professional path: master keyword search foundations first, then enhance with vectors for hybrid retrieval. 课程用一句更锋利的话做了注解——build RAG systems the way successful companies do: solid search foundations enhanced with AI, not AI-first approaches that ignore search fundamentals.
这个判断值得展开,因为它解释了一件反直觉的事:为什么一个讲 Agentic RAG 的课程,会把 Week 3 整周花在 BM25 上。
向量检索擅长的是"意思相近"。你问"怎么让检索结果更相关",它能找到讨论 relevance 的段落。但它不擅长精确匹配:arXiv 编号 2401.12345、模型名 BM25、作者姓氏、一个自定义的术语缩写。这些 token 在 Embedding 空间里没有稳定的几何位置,向量模型没见过或见得少的字符串,会被映射到语义邻域里的随机位置。而 RAG 的查询里有相当比例是这样的"硬约束"查询。
关键词检索则相反:它对精确 token 高度敏感,可解释——你能说清为什么这篇论文排第一,因为它在 title 字段命中了查询词,而且 BM25 的 TF-IDF 结构给了它一个明确分数。加上 OpenSearch 的 filter 与 boost,你还能表达"必须是 cs.CL 分类、时间在最近两年内、title 命中权重高于 abstract"这类业务规则,向量相似度做不到这种硬边界。
所以课程给出的顺序是:Weeks 1-2 搭地基和喂数据,Week 3 先把关键词检索做扎实(index management、mapping 设计、BM25、Query DSL、搜索质量指标),Week 4 才引入 Chunking 与 Embedding,然后用 RRF 把两路结果融合成 Hybrid Search。向量是增强项,不是替代项。你手里先有一个能解释、能调试、能设硬条件的检索器,再往上叠语义召回,出问题时才分得清是关键词这一路错了,还是向量这一路错了。
Week 0-7 学习路线
下表按 README 的 Weekly Learning Path 整理,每一行都对应一篇 substack 博客和一个 GitHub release tag。Week 0 是规划篇,没有代码 release。
| Week | 主题 | 对应 blog | 代码 release |
|---|---|---|---|
| Week 0 | The Mother of AI project - 6 phases | The Mother of AI project | - |
| Week 1 | Infrastructure Foundation | The Infrastructure That Powers RAG Systems | week1.0 |
| Week 2 | Data Ingestion Pipeline | Building Data Ingestion Pipelines for RAG | week2.0 |
| Week 3 | OpenSearch ingestion & BM25 retrieval | The Search Foundation Every RAG System Needs | week3.0 |
| Week 4 | Chunking & Hybrid Search | The Chunking Strategy That Makes Hybrid Search Work | week4.0 |
| Week 5 | Complete RAG system | The Complete RAG System | week5.0 |
| Week 6 | Production monitoring & caching | Production-ready RAG: Monitoring & Caching | week6.0 |
| Week 7 | Agentic RAG & Telegram Bot | Agentic RAG with LangGraph and Telegram | week7.0 |
逐周的产物,README 的 What You'll Build 部分列得很具体:
- Week 1:完整基础设施,Docker、FastAPI、PostgreSQL、OpenSearch、Airflow 全部跑起来(README 标注状态 ✅)。
- Week 2:自动数据管道,从 arXiv 抓取并解析论文(README 标注状态 ✅)。
- Week 3:生产可用的 BM25 关键词检索,带 filter 与 relevance scoring。
- Week 4:智能 Chunking + Hybrid Search,把关键词和语义理解合到一起。
- Week 5:完整 RAG pipeline,本地 LLM、streaming 响应、Gradio 界面。
- Week 6:生产级监控,Langfuse tracing + Redis cache。
- Week 7:Agentic RAG,用 LangGraph 编排,加 Telegram Bot 提供移动端访问。
到 Week 7 时,端到端的服务地址是这样一张表,每一章动手时你都会回到它:
| Service | URL | Purpose |
|---|---|---|
| API Documentation | http://localhost:8000/docs | Interactive API testing |
| Gradio RAG Interface | http://localhost:7861 | User-friendly chat interface |
| Langfuse Dashboard | http://localhost:3000 | RAG pipeline monitoring & tracing |
| Airflow Dashboard | http://localhost:8080 | Workflow management |
| OpenSearch Dashboards | http://localhost:5601 | Hybrid search engine UI |
最终系统能力
走完 Week 7,你手上的东西不是"一个能聊天的 PDF",README 把 Key Innovations 归结为六条能力,它们全部建立在前面六周的检索、生成、监控层之上:
- Intelligent Decision-Making:Agent 会评估并调整检索策略,而不是固定跑一遍召回。
- Document Grading:对召回文档做语义层面的相关性打分,自动判断拿到的东西够不够用。
- Query Rewriting:结果不充分时自适应改写查询,再去检索。
- Guardrails:越域检测,用户问的超出论文库范围时直接拦掉,减少 hallucination。
- Mobile Access:Telegram Bot,任何设备上都能对话。
- Transparency:完整记录推理步骤,便于调试,也让使用者知道答案是怎么来的。
Week 7 的代码落点也一并给出,方便你对照目录找文件:agent 节点在 src/services/agents/nodes/(guardrail、retrieve、grade、rewrite、generate),工作流编排在 src/services/agents/agentic_rag.py,Telegram 相关在 src/services/telegram/,对外接口是 src/routers/agentic_ask.py,学习材料在 notebooks/week7/。
技术栈与项目结构
技术栈全部在 docker compose 里编排,README 的状态列标注为全部 Ready。
| Service | Purpose | Status |
|---|---|---|
| FastAPI | REST API with automatic docs | ✅ Ready |
| PostgreSQL 16 | Paper metadata and content storage | ✅ Ready |
| OpenSearch 2.19 | Hybrid search engine (BM25 + Vector) | ✅ Ready |
| Apache Airflow 3.0 | Workflow automation | ✅ Ready |
| Jina AI | Embedding generation (Week 4) | ✅ Ready |
| Ollama | Local LLM serving (Week 5) | ✅ Ready |
| Redis | High-performance caching (Week 6) | ✅ Ready |
| Langfuse | RAG pipeline observability (Week 6) | ✅ Ready |
Development Tools: UV, Ruff, MyPy, Pytest, Docker Compose
各服务的默认端口(README 的 Week 1 Infrastructure Components 口径):FastAPI 8000,PostgreSQL 5432,OpenSearch 9200 与 Dashboards 5601,Airflow 8080,Ollama 11434。
目录结构按职责分层,routers 放接口、services 放业务逻辑,这个划分和后面每一章的代码位置一一对应:
arxiv-paper-curator/
├── src/                    # Main application code
│   ├── routers/            # API endpoints (search, ask, papers)
│   ├── services/           # Business logic (opensearch, ollama, agents, cache)
│   ├── models/             # Database models (SQLAlchemy)
│   ├── schemas/            # Pydantic validation schemas
│   └── config.py           # Environment configuration
├── notebooks/              # Weekly learning materials (week1-7)
├── airflow/                # Workflow orchestration (DAGs)
├── tests/                  # Test suite
└── compose.yml             # Docker service orchestration
API 层随着周次逐步长出来,这张表也说明了"先检索后生成"的顺序:
| Endpoint | Method | Description | Week |
|---|---|---|---|
/health |
GET | Service health check | Week 1 |
/api/v1/papers |
GET | List stored papers | Week 2 |
/api/v1/papers/{id} |
GET | Get specific paper | Week 2 |
/api/v1/search |
POST | BM25 keyword search | Week 3 |
/api/v1/hybrid-search/ |
POST | Hybrid search (BM25 + Vector) | Week 4 |
环境变量的获取节奏同样值得提前知道,免得 Week 4 才发现缺 key:JINA_API_KEY 从 Week 4 起必需(Embedding),TELEGRAM__BOT_TOKEN 是 Week 7 必需,LANGFUSE__PUBLIC_KEY 与 LANGFUSE__SECRET_KEY 是 Week 6 的可选项。起步方式是先复制配置模板再改:
cp .env.example .env
# Edit .env for your environment
前置条件按 README 的口径:Docker Desktop(含 Docker Compose)、Python 3.12+、UV 包管理器,机器至少 8GB+ RAM 与 20GB+ 可用磁盘。启动流程五步走完:
# 1. Clone and setup
git clone
cd arxiv-paper-curator

# 2. Configure environment (IMPORTANT!)
cp .env.example .env
# The .env file contains all necessary configuration for OpenSearch,
# arXiv API, and service connections. Defaults work out of the box.
# You need to add Jina embeddings free api key and langfuse keys (check the blogs)

# 3. Install dependencies
uv sync

# 4. Start all services
docker compose up --build -d

# 5. Verify everything works
curl http://localhost:8000/api/v1/health
日常操作推荐走 Makefile,README 列出的目标覆盖了起停、健康检查、格式化、lint、测试与清理:
| Command | Description |
|---|---|
make start |
Start all services |
make stop |
Stop all services |
make restart |
Restart all services |
make status |
Show service status |
make logs |
Show service logs |
make health |
Check all services health |
make setup |
Install Python dependencies |
make format |
Format code |
make lint |
Lint and type check |
make test |
Run tests |
make test-cov |
Run tests with coverage |
make clean |
Clean up everything |
成本结构与目标读者
成本这块,官方 README 给出的口径是:课程本身完全免费,只有可选服务产生少量费用。具体两项——Local Development: $0(所有东西本地跑),Optional Cloud APIs: ~$2-5(如果你选择用外部 LLM 服务)。这个数字要按它原本的口径理解:它是"可选外部 LLM 服务"的估算,不是这套系统运行的必需支出,因为 Week 5 的 LLM 走的是本地 Ollama。真正的隐性成本是机器资源——8GB 内存起步、20GB 磁盘,这是同时跑 OpenSearch、PostgreSQL、Airflow、Redis、Langfuse、Ollama 一整套的代价,Docker Desktop 的内存分配不够时服务会起不来(README 的 troubleshooting 就列了这一条)。
目标读者,README 分了三类:
| Who | Why |
|---|---|
| AI/ML Engineers | Learn production RAG architecture beyond tutorials |
| Software Engineers | Build end-to-end AI applications with best practices |
| Data Scientists | Implement production AI systems using modern tools |
三类人的共同点是都已经会写代码,缺的不是"什么是 RAG",而是把 RAG 做成能跑在生产里的系统的完整经验。所以这门课不讲"如何调一个 API",而是花时间在 mapping 怎么设计、cache key 怎么定、TTL 怎么管、trace 里该记哪些 span、DAG 怎么排这些问题上。
最后交代一下这门课的来源与许可:jamwithai/production-agentic-rag-course,MIT License,由 Shirin Khosravi Jam 与 Shantanu Ladhwe 维护,本次整理时仓库有 9441 stars。本书是在这份开源材料基础上改写的中文版,代码与配置保留英文原文,工程判断按原课程的路线走。
参考链接
- 课程仓库 README:https://github.com/jamwithai/production-agentic-rag-course/blob/main/README.md
- 课程 LICENSE(MIT):https://github.com/jamwithai/production-agentic-rag-course/blob/main/LICENSE
- 配置模板
.env.example:https://github.com/jamwithai/production-agentic-rag-course/blob/main/.env.example - Week 1 notebook:https://github.com/jamwithai/production-agentic-rag-course/blob/main/notebooks/week1/week1_setup.ipynb
- Week 2 notebook:https://github.com/jamwithai/production-agentic-rag-course/blob/main/notebooks/week2/week2_arxiv_integration.ipynb
- Week 3 notebook:https://github.com/jamwithai/production-agentic-rag-course/blob/main/notebooks/week3/week3_opensearch.ipynb
- Week 4 notebook:https://github.com/jamwithai/production-agentic-rag-course/blob/main/notebooks/week4/week4_hybrid_search.ipynb
- Week 5 notebook:https://github.com/jamwithai/production-agentic-rag-course/blob/main/notebooks/week5/week5_complete_rag_system.ipynb
- Week 6 notebook:https://github.com/jamwithai/production-agentic-rag-course/blob/main/notebooks/week6/week6_cache_testing.ipynb
- Week 7 notebook:https://github.com/jamwithai/production-agentic-rag-course/blob/main/notebooks/week7/week7_agentic_rag.ipynb
- Week 0 blog — The Mother of AI project:https://jamwithai.substack.com/p/the-mother-of-ai-project
- Week 1 blog — The Infrastructure That Powers RAG Systems:https://jamwithai.substack.com/p/the-infrastructure-that-powers-rag
- Week 2 blog — Building Data Ingestion Pipelines for RAG:https://jamwithai.substack.com/p/bringing-your-rag-system-to-life
- Week 3 blog — The Search Foundation Every RAG System Needs:https://jamwithai.substack.com/p/the-search-foundation-every-rag-system
- Week 4 blog — The Chunking Strategy That Makes Hybrid Search Work:https://jamwithai.substack.com/p/chunking-strategies-and-hybrid-rag
- Week 5 blog — The Complete RAG System:https://jamwithai.substack.com/p/the-complete-rag-system
- Week 6 blog — Production-ready RAG: Monitoring & Caching:https://jamwithai.substack.com/p/production-ready-rag-monitoring-and
- Week 7 blog — Agentic RAG with LangGraph and Telegram:https://jamwithai.substack.com/p/agentic-rag-with-langgraph-and-telegram
- Release week1.0:https://github.com/jamwithai/arxiv-paper-curator/releases/tag/week1.0
- Release week2.0:https://github.com/jamwithai/arxiv-paper-curator/releases/tag/week2.0
- Release week3.0:https://github.com/jamwithai/arxiv-paper-curator/releases/tag/week3.0
- Release week4.0:https://github.com/jamwithai/arxiv-paper-curator/releases/tag/week4.0
- Release week5.0:https://github.com/jamwithai/arxiv-paper-curator/releases/tag/week5.0
- Release week6.0:https://github.com/jamwithai/arxiv-paper-curator/releases/tag/week6.0
- Release week7.0:https://github.com/jamwithai/arxiv-paper-curator/releases/tag/week7.0
下一章从 Week 1 开始动手:把这套基础设施真正跑起来,把 FastAPI、PostgreSQL、OpenSearch、Airflow、Ollama 五个服务连通,并让健康检查通过。基础设施没跑通之前,后面所有关于检索质量的讨论都无从验证。